


By Peter
How Much Does It Cost To Install A Kitchen?
For many of us, considering changing our kitchen is not an everyday event. It may be something that we’ve never done before, and for others, it may seem like a lifetime ago. The process is a complicated one. It’s not something you just pop out and buy – there are many stages to the design and planning process before you reach the day where you say goodbye to your old kitchen as you see it dismantled from your home.
Regardless of your budget, the cost outlay for most people is large. It is a purchase for your home that could potentially last 20-30 years and, therefore, it is just as important that it is installed to a high standard to ensure longevity.
“You Can Install A Good Product Badly, Or A Bad Product Well. It Is The Combination Of Installing A Good Product Well That Will Ensure Value And Longevity”
The journey of installing a new kitchen is far more complex than simply out with the old and in with the new. Understanding what is involved and being prepared for what to expect is the key to a fluid, well-planned kitchen installation. You can see just some of the complexity in this time-lapse video (click HERE to watch it).
Kitchen Installation: An Overview
Before a kitchen can be installed, a certain amount of preparation work (or ‘prep’ as we refer to it) will need to be considered. Everyone has a unique home, and every project is different, so certain works may not be needed, but it is worth knowing what may need to be done so that appropriate planning and time can be scheduled.
The list below gives an idea of the order of work and how a typical schedule might look…
- Existing kitchen removal
- Existing floor removal
- Existing wall tile removal
- Gas cap off
- Disconnecting the sink and washing machine
- Removal and disposal of rubbish
- First fix electrical work
- First fix plumbing work
- Gas work
- Lighting
- Consumer unit
- Ceiling tacking
- Plastering
- Latexing/Ply prep
- Delivery
- Dry fit carpentry
- Templating & prefabrication
- Worktop installation
- Second fix electrical
- Second fix plumbing
- Gas connection
- Splashbacks/wall tiling
- Flooring
The list can appear exhaustive, but being aware of the process will eliminate, or at least minimize unexpected costs from cropping up mid-process. It will allow those who plan to project manage themselves to source the right tradespeople and schedule in the correct amount of time so that the workflow is harmonious and smooth. And it will allow those choosing a project-managed service with a company to prepare for what to expect.
How Much Does Kitchen Installation Actually Cost?
Before we move on to explore the journey of the kitchen installation and what to expect, let’s take a look at an idea of the costs involved. It is advisable to look at groups of costs, as some of the work involved can be done at the same time as others and by the same person.
You will find below some cost indications of how much to expect to pay for each of the stages;
- Existing kitchen, floor and wall tile removal: £200-600
- Gas cap off/gas work/gas connection: £150-£500
- Removal and disposal of rubbish: £100-£400
- First and second fix electrical works: £400-1,200
- First and second fix plumbing works: £200-400
- Lighting: £50-400
- Consumer unit: £300-£450
- Ceiling tacking and plastering: £200-£900
- Latexing/ply prep: £150-£300
- Delivery: £50-£200
- Dry fit carpentry: £2,000-£4,000
- Templating, prefabrication and worktop installation: £250-£600
- Splashbacks/wall tiling: £300-£2,000
- Flooring: £300-£2,500
Whether you are opting for a kitchen company to completely project manage for you, or whether you are considering project managing yourself, it is incredibly important to agree to a written quotation in advance.
Due to the potential of unexpected issues or problems, which may not have been identifiable prior to the existing kitchen being removed, it is, therefore, advisable to be prepared for any extra work and have a contingency factored in for these. However, there are many parts of the installation process which can be quoted accurately prior to beginning the work.
It is dangerous to move ahead with a project without a written agreement of costs and what will be covered by the quotation. By working on verbal agreements or without an itemised listing of what has been agreed between both parties, you leave yourself open to being hit with potentially endless additional costs by independent tradespeople you appoint.
A good example of this is, during a dry fit install, an individual being told by a kitchen installer “this is taking longer than I thought it would, so I’m going to have to charge you more”. A competent kitchen fitter should be able to accurately predict the time and work involved in the project in advance and offer a precise cost that both would agree to before anything is undertaken
The Importance Of A Surveyor
Before any work begins or any units are ordered, it is extremely important that this ‘check’ stage happens by a qualified individual. This would usually involve advising or assisting in planning the prep work, what will be needed as well as making sure the measurements are accurate. This can be done by the individual’s kitchen installer or a competent builder or if opting for a project managed service by a company, they would typically take ownership of the entire project.
Existing Kitchen, Floor And Wall Tile Removal
Day one is the removal of all existing components (unless certain parts are being kept, such as the flooring). This would, on average take between half a day to two days, dependent on the size of the room and what is to be removed.
It is possible to maintain existing units- some people opt to reuse some old cupboards, for example, in their garage or utility room. Instruction needs to be given to the person removing the kitchen, so more care can be taken in the removal.

Gas Cap Off/Gas Work/Gas Connection
The regulation to be ‘Gas Safe’ registered to complete gas works is not only advisable but a legal requirement. It is not sufficient for someone to assure you that they ‘know what they are doing’, regardless of how capable they seem to be. Gas is dangerous, and certification is vital.
There may be three types of gas work involved in a new kitchen. Step one is for the existing gas pipe to be ‘capped off’ to a safe level when the kitchen is ripped out, so there are no leaks. Step two (if required) would be to run gas pipework to a new location, for example, if the gas hob is in a different place in the new kitchen design. Step three would be to recommission the gas and test it to ensure it is safe with no leaks.
The gas engineer will need to attend to carry out this work at different stages of the process, which means attending two, or even three separate times. A full quote would need to ensure all these visits and work have been factored in.
Removal And Disposal Of Kitchen Rubbish
The rubbish disposal is not free or even cheap. The amount of rubbish generated from a kitchen project can be substantial. Not only is it going to consist of the waste from the existing kitchen, but will also include packaging and waste for the new kitchen.
It is important to make sure that a kitchen company offering a full install service has included rubbish removal and disposal. If you are sourcing your own tradespeople, rubbish disposal may also be something you will need to make sure they have accounted for. It is very important that any person disposing of the waste is doing so in a legal way. Fly tipping is a big problem in the UK and if your waste is dumped by someone and it is traced back to you, it could be you that faces an unlimited fine or a five-year prison sentence, depending on where you live in the UK.
A kitchen project can often easily fill a skip. If considering hiring one, you will need to look into the cost of the hire, a council permit if necessary, as well as maximum limits to weight and loading, as well as protecting yourself against other members of the public using your skip to dump their own rubbish.

Link to information about fly-tipping and rubbish disposal: https://www.kent.gov.uk/waste-…
First And Second Fix Electrical Works
Similar to the gas engineer, you will also want someone professional and competent to complete your electrical works. Not only is safety an incredibly important aspect, but a legal test called a ‘Part P’ will need to be passed on your property in the majority of cases to confirm that the electrics in your home are safe. Faulty electrical work can in the worst instances cause injury and even death, so making sure your kitchen is safe is a priority.
An electrician’s ‘first fix’ stage involves running new cables and wires to the correct locations to suit a new design layout. Even if your proposed kitchen layout is similar to the existing footprint, this does not necessarily mean that new electrics won’t be required. Your old oven, for example, may have had a simple plug, but many modern-day ovens require a ‘hard-wire’, meaning they have no plug and need a different type of cable.
The ‘second fix’ stage will mean a return by the electrician to connect the new electrics and test the system. Again, you will need to ensure that all required visits are quoted for and you will not be stung for unexpected ‘extras’ during the process.
First And Second Fix Plumbing Works
The first stages of plumbing may involve running pipework to new locations as dictated by the design. If the location of the sink is not changing in the design, this doesn’t mean you’ll escape plumbing work. Additional plumbing may be required- for example, adding a dishwasher when there was not one before. The second or final fix stage is connecting the appliances, sink and tap to the plumbing and testing the work.
Water can destroy a kitchen and a leak can be utterly devastating to someone’s home. Any tradespeople involved in working with plumbing should be completely proficient and adequate testing should always be carried out.
Kitchen Lighting
Lighting can make or break a kitchen design, and thinking properly about how and where lighting is used is important.
If you are opting for a complete service, a lighting plan can be completed in advance by your kitchen company, but if you are orchestrating the installation yourself, this may be an aspect you will need to plan with your electrician.
If ceiling spotlights are required, the electrician will need to do the substantial rewiring of your ceiling lights, as well as running cables to power any lighting that you are having under wall units or inside cupboards.

Consumer Unit
This is also known as a ‘fuse box’ and is the main point in your home where you can control your electrics. The electrician will need to look at this to make sure it meets ‘Part P’ regulation, as your home will fail the test if this is not up to date. This can be a substantial cost, so it should be checked during the quoting stage to ensure that this has been factored into the budget.
Ceiling Tacking And Plastering
After the lighting, electrical and plumbing prep work have been completed, you will then most likely require a plasterer if;
- Existing wall tiles have been removed
- Substantial electrical work has been carried out on the walls and/or ceiling
- The walls in the room are a poor quality
- There is Artex that an individual no longer wants
It may be sufficient for a plasterer to ‘patch plaster’ areas where needed, such as in places where tiles have been removed. If the walls of the home are plasterboard rather than solid, some of this may have been pulled off with the tiles and will need to be rebuilt. If the electrician has cut into the existing ceiling to install new downlight positions, ‘tacking’ (which means over-boarding the existing ceiling with plasterboard) may be required. The amount of work needed by a plasterer will vary substantially on each project.
Latexing/Ply Prep
The question of whether your floor should be prepped with plyboard or latex is usually dependent on whether you have floorboards or a concrete floor, as well as what was previously covering the floor. For example, if you have ceramic tiles on a concrete floor, chances are these were drilled or smashed up, so the floor would now be in a state. But if you had vinyl on a wooden floor, once taken up it may not look too bad.
How Long Does It Take To Get A Kitchen Delivered?
A big question to ask when planning a kitchen is ‘when will my kitchen be delivered?’
Answers to this question may vary, even if they are coordinating the entire project. Some will deliver up to a month prior to the kitchen being ripped out, through to those delivering the day that the kitchen is due to be installed after prep is complete.
The huge issue, of course, can be how and where that kitchen is stored, especially as you may not just have units, but will also have boxes of appliances and worktops to store.
If you are coordinating your own project it can be trickier to coordinate delivery with completion of prep work, as being left for a week with prep complete but no kitchen can be frustrating, but so can having the kitchen delivered prematurely and having to store it elsewhere in your home as your tradespeople are still working on the prep in the kitchen.
When producing your own schedule, it is worthwhile taking this into account, as it may be difficult to pinpoint an exact day for suitable kitchen delivery when you are scheduling in potentially four or five different tradespeople and feeling unsure exactly how long each will take.
Dry Fit Carpentry
Now that the room is prepared and ready, it is now the time that most people look forward to during the process – seeing the kitchen start to take shape.
There are two different types of kitchens available which will influence what comes next- those that are delivered pre-built, and those that come flat packed.
You should take into account that the installation time for a flat pack kitchen may be considerably longer, as your kitchen installer needs to spend a considerable amount of time building each unit in your home. If sourcing your own kitchen installer, part of the quote that you are given in advance should have taken this into account.
The units will be positioned around the room in the correct layout, and then they will be levelled, adjusted and fixed into place. The ‘dry fit’ stage would typically take around four to seven days, dependent on the size and complexity of the kitchen design.
If laminate or wooden worktops have been chosen, they would be installed during the ‘dry fit’ installation process.
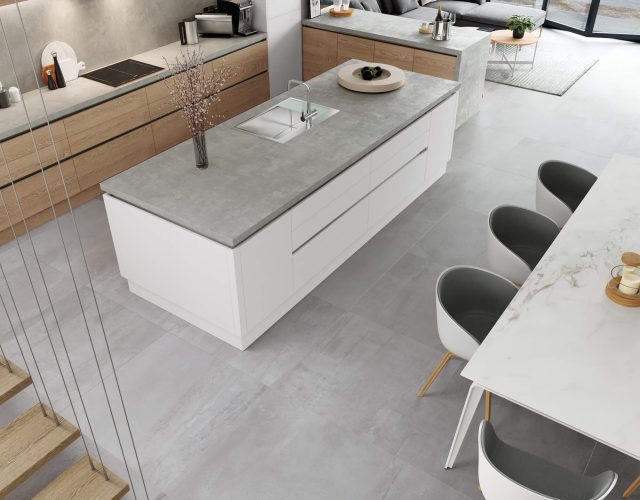
Templating, Prefabrication And Worktop Installation
If you have chosen a worktop option that requires a templating and prefabrication service, this would normally occur once the units are installed and the worktop company can attend to take the measurements and make the templates. This could be for granite, composite stone, glass, wood or corian.
Once the templates have been taken, the worktop company will leave to take these back to their factory to ‘prefabricate’ your worktops to precise dimensions using their factory machinery. This process can take anything from a couple of days through to weeks.
If you are project managing your own kitchen installation, it is important to know when this will be, as you will need to schedule the return of your plumber, gas tradesperson and potentially even your electrician to complete their connections once the worktops are installed.
Splashbacks/Wall Tiling
After the worktops are installed, it is then time to install your wall finish. Some people simply opt for an ‘upstand’ which is a small strip of the same worktop material to run as a barrier around the kitchen usually around 4-6” high and then paint the wall above. If this option is chosen, then this would usually have already been fitted during the worktop installation process.
If an individual has chosen wall tiles as their covering option, at this point the tiler would come into tile the walls. It is extremely important that the tiles are installed after the worktops and not before, as the tiles need to sit on top of the worktops and be sealed in. If tiles are installed before the worktop, it can be very difficult to cut the worktops and achieve a professional finish, as well as a lowered level of protection for the units below.
Another popular option for wall finishes is glass splashbacks. These are truly bespoke and involve another ‘templating and prefabrication’ service where the glass is measured for, and then templates are made. This can add a further week to a few weeks of time to the installation time. This would also apply to mirror splashbacks, which fall under the realm of glass, but can potentially be more expensive.
Acrylic can be chosen for wall finishes, but it is important to check the suitability of this being used in certain areas, for example behind a hob, where the material may have heat intolerances.

Kitchen Flooring
Finally, the flooring will be installed. This is actually a stage that can be fitted at different stages in the project, dependent on what type of flooring you are opting for.
If a ceramic or porcelain floor tile is being used, these can actually be laid in the ‘prep’ section and the kitchen dry-fit can go on top of these. They can also be installed after and only go up to the front legs of the units.
Natural or engineered wood flooring can be opted for, but it is not advisable to put this under the units, as often it is not waterproof. If there was a leak in your kitchen and the floor warped, it is sensible to be able to remove this floor without affecting the kitchen units or worktops.
A third popular option is vinyl. There are different types, and vinyl can either be one big sheet rolled out across the kitchen and then cut around the units, or ‘LVT’ (luxury vinyl tile) comes in individual tile or plank sizes and can be laid like tiles or wood but will be stuck down. It is unusual for any kind of vinyl to run under kitchen units.